Get Started With Online Scheduling
Advanced Online Scheduling allows your patient to book specific services at specific times, directly into your EHR schedule. This helps streamline your scheduling and saves your staff time by allowing patients to book on their own.
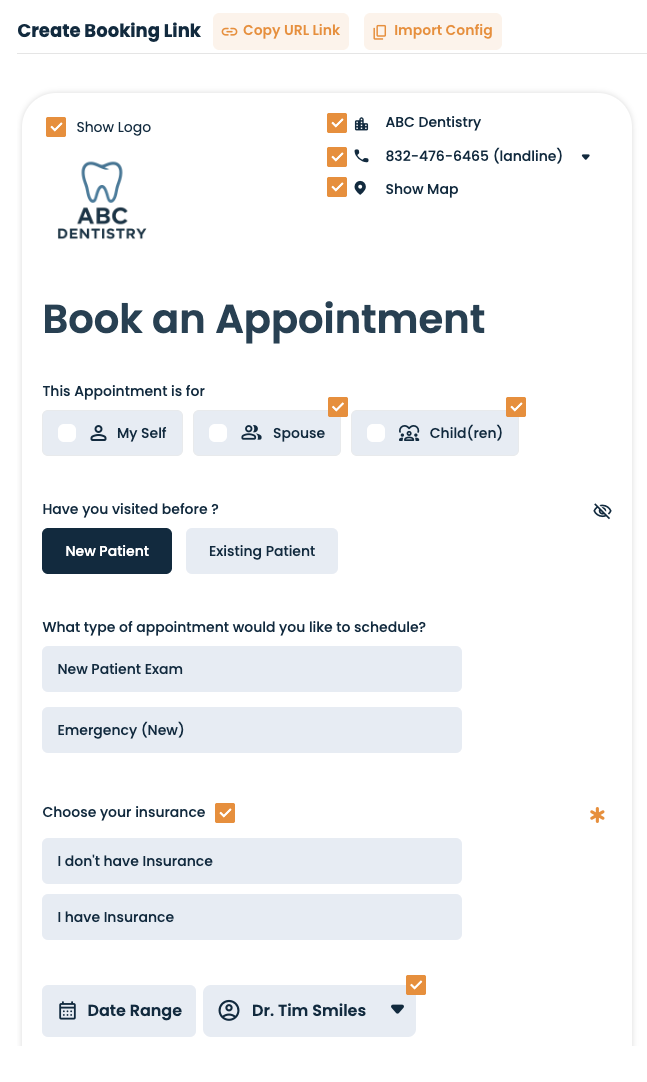
To learn how to set up online scheduling please follow this guide:
Set Up Your Logo
Select Choose File
Upload Your Logo
Set Up Your Receptionist Email
Add all email addresses that should receive a copy of your incoming appointment requests
Select Save
Advanced Online Scheduling Toggle
Select Yes if you would like to enable Advanced Online Scheduling and allow patients to book appointments based on your real time availability.
In the dropdown, select whether you want this to be available for only New Patients, only Existing Patients, or both.
- Select No if you only want basic online scheduling where patients can submit a form to request an appointment.
Write Appointments into EHR Toggle
Select Yes if you want to allow Adit to write appointments directly back into your EHR
In the Dropdown, select whether you want this to be applied to only New Patients, only Existing Patients, or both.
Select No if you do NOT want Adit to write appointments back into your EHR.
Click Here to learn how to configure the following settings:
Setting up Services for New & Existing Patients
Defining your services will allow patients to book with a particular provider in a particular operatory at a particular time, ensuring your schedule is seamless and saving your office staff time. Make sure the services are clearly defined and easy for your patients to understand the schedule.
Click + Create Service and fill out the required fields:
Name of Service: Choose a service that will be displayed on the booking link
Patient Type: Is this service for New or Returning patients?
Select Locations: select all of the locations that offer this service
Select Next
Service Duration: Choose the amount of time to block in your schedule for this service.
Appointment Type: Select the appointment type from the dropdown menu
Tx Codes (From EHR): Choose the tx codes you want to associate to this appointment
Select Save
Click the toggle to enable/disable which services will be available for online scheduling
Enable Operatories Available for Booking
Click the toggle to enable/disable which operatories will be available for online scheduling.
Configure Operatory to Service Rules
1. Update the matrix grid by checking the boxes to match services to operatories
2. Click Save to save your changes
3. Click Reset to clear the matrix.
Show Provider
Select Yes if you would like to allow patients to book appointments with a specific provider
In the dropdown, select whether you want this to be applied for only New Patients, only Existing Patients, or both.
Select No if you don’t want to give patients the option to book with a specific provider.
Choose how you want Adit to associate a Provider to the appointment
Default one provider for all appointments for a new patient
Choose a specific provider depending on which operatory the appointment will be booked in
Enable Providers
Click the toggle to enable/disable which providers will be available for online scheduling
Provider to Service Rules
Update the matrix grid by checking the boxes to match providers to services
Click Save to save your changes
Click Reset to clear the matrix.
Provider to Operatory Rules
Update the matrix grid by checking the boxes to match providers to operatories.
Click Save to save your changes
Click Reset to clear the matrix.
Adit’s Formula for Availability
Click Here to learn how to how Adit will calculate your availability
How to Set Your Office Hours
Select + Add Business Hours (or Edit Business Hours)
Enable the days where your practice is open
Enter the working hours for your practice
Press Save
How to Define the Earliest Time a Patient can Book Their Appointment
Enter how many hours in advance you require patients to schedule. For example: if your practice does not offer same-day appointments, enter at least 24 in the Calendar Buffer field.
Click Here to learn how to set up your custom booking link
Related Articles
Managing the Online Scheduling Blacklist
The Blacklist feature in Online Scheduling allows your practice to prevent patients from booking appointments online. This can be helpful for preventing patients who consistently no-show, and decreasing unwanted/spam bookings. How Does the Blacklist ...How to Find “Getting Started” Steps
How to Find “Getting Started” Steps 1. Login to app.adit.com 2. Locate the blue button at the top of the screen that says “Get Started” 3. Select “Set Up” and provide relevant information until all sections say “completed” 4. Once all sections are ...How To: Embed Your Online Scheduling Using Webforms
Webforms are a convenient way to allow patients to schedule or request appointments directly from your website, without needing to click a link and be redirected to a new page. This article can help your website designer or host by providing a custom ...Enable or disable individual operatories for online scheduling
Configuring your operatories will ensure that your online scheduling is as accurate as possible, allowing you to fit more patients into your schedule. Note: Advanced Online Scheduling is only available if your EHR is integrated with the Adit ...Managing Insurances in Online Scheduling
Adit’s Online Scheduling Insurance Settings allow practices to control how insurance information is collected from new patients when booking an appointment online. This article explains what each toggle means and how it impacts your patient booking ...