How To Set Up Legacy TXT Records/DNS Records for Your Domain
- Add your sender domain.
- Copy the SPF and DKIM TXT records from your Adit account.
- Add the SPF and DKIM TXT records to the DNS server.
- Verify your domain in your Adit account after adding the SPF and DKIM TXT records to the DNS server.
Add your sender domain
- Log in to your Adit account.
- From the navigation toolbar, choose Locations .
- Select Communications under your location.
- Enter your sender address in the Sender Address field.
- Click the Send Verification Email button to receive verification emails at the email address you have provided.
- To verify your email addresses, log in to your email client and open the verification email sent by Adit.
- Click the Verify your email address button in the email to complete the verification process.
 Note : If you have not received the verification email, please check all the folders/filters in your email client. If you still don't find them, please contact support@adit.com .
Copy SPF and DKIM record values from Adit
- Log in to your Adit account.
- From the navigation toolbar, choose Locations .
- Select Communications under your location.
- On the Setup page, click the Copy button next to the text records.
GoDaddy
- Log in to your GoDaddy account and navigate to Domain Control Center .
- Select your domain to access the Domain Settings page.
- Under Additional Settings, select Manage DNS .
- Select Add under the records table.
- Under Type, select TXT .
- Enter the following information:
- Type : Select TXT as the type of record to be added.
- Host : Enter " @ ".
- TXT Value : Paste the SPF TXT record displayed in the SPF/DKIM screen.
- TTL : Enter how long the server should take to cache the information. - Click Save
- Locate the record you added and click Edit .
- Edit the record as needed
- Click Save.
- Log in to your GoDaddy account and navigate to Domain Control Center .
- Select your domain to access the Domain Settings page.
- Under Additional Settings, select Manage DNS .
- Select Add under the records table.
- Under Type, select TXT .
- Enter the following information:
- Type : Select TXT as the type of record to be added.
- Host : Enter the DKIM host name displayed in the SPF/DKIM Setup screen. (Example:"2232._domainkey")
- TXT Value : Paste the DKIM TXT record displayed in the SPF/DKIM Setup screen of your Adit account.
- TTL : Enter how long the server should take to cache the information.
Note :
- If your DNS has already mentioned the domain name, enter the domain key alone in the Host Name field.
- Log in to your Adit account.
- From the navigation toolbar, choose Locations .
- Select Communications under your location.
- Click Verify Domain .
- If the records are not published in the DNS, you can check the reason and how to fix it on the same screen.
HostGator
- Log in to your HostGator account.
- Navigate to the control panel and search for your domain name.
- From the navigation toolbar, choose Manage Orders and click List/Search Orders .
- Click on your domain from the list displayed.
- Under the DNS Management section, click the Manage DNS link.
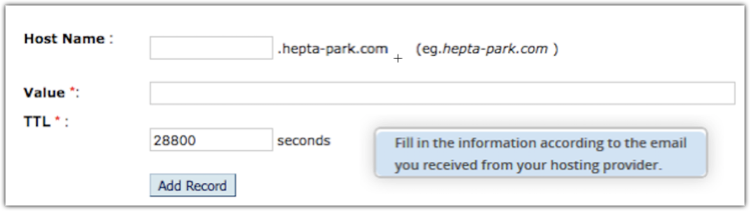
- First click the TXT Records button to add the SPF record and then click the Add TXT Record button below it.
- Enter the following information:
- Host Name : Enter "@"
- Value : Paste the SPF TXT record displayed in the SPF/DKIM Setup screen.
- TTL : Enter how long the server should take to cache the information. The ideal TTL is 86400 (1 day). It can not be set to less than 14400 (4 hours). - Click Add Record.
- Locate the record you added and click the Modify Record button.
- Edit the record as needed.
- Click Modify Record
- Log in to your HostGator account.
- From the Navigation toolbar, choose Manage Orders and click List/Search Orders .
- Click on your domain from the list displayed.
- Under the DNS Management section, click Manage DNS .
- First click the TXT Records button to add the DKIM TXT record and then click the Add TXT Record button displayed below it.
- Enter the following information:
- Host Name : Enter the DKIM host name displayed in the SPF/DKIM Setup screen. (Example: 2232._domainkey)
- Value : Paste the DKIM TXT record displayed on the SPF/DKIM Setup screen of your Adit account.
- TTL : Enter how long the server should take to cache the information. The ideal TTL is 86400 (1 day). It can't be set to less than 14400 (4 hours). - Click Add Record .
- If your DNS has already mentioned the domain name, enter the domain key alone in the Host Name field.
- Log in to your Adit account.
- From the navigation toolbar, choose Locations .
- Select Communications under your location.
- Click Verify Domain .
- If the records are not published in the DNS, you can check the reason and how to fix it on the same screen.
Namecheap
- Log in to your Namecheap account.
- Click Domain List on the left pane.
- Click the Manage button next to your domain.
- Under the Advanced DNS tab, click the Add New Record button.
- Enter the SPF and DKIM TXT records provided by Adit.
- Type : Select TXT as the type of record you want to add.
- Host : Enter" @ ".
- Value: Paste the SPF TXT record displayed on the SPF/DKIM Setup screen.
- TTL : Enter how long the server should take to cache the information.
- Note : A sender domain can have only one SPF TXT record. We recommend not to add a new record if you already have one. If you have an existing SPF TXT record,
- Locate the record you added and click Edit .
- Edit the record as needed.
- Click Save .
- Locate the record you added and click Edit .
- Log in to your Adit account.
- From the navigation toolbar, choose Locations .
- Select Communications under your location.
- Click Verify Domain .
- If the records are not published in the DNS, you can check the reason and how to fix it on the same screen.
BlueHost
- Log in to your BlueHost account.
- Go to the Domains menu at the top and click the Zone Editor submenu.
- Select your domain name from the drop-down.
- To add a new SPF record, enter this information under Add DNS Record at the top of the Zone Editor :
- Type : TXT
- Name : Enter the domain name
- TXT : Paste the SPF TXT record displayed in the SPF/DKIM Setup screen
- TTL : Enter how long the server should take to cache the information - Click Add Record
- Locate the record you added and click the Modify Record button.
- Edit the record as needed.
- Click Modify Record.
- Log in to your BlueHost account.
- Go to the Domains menu at the top and click the Zone Editor submenu.
- Select your domain name from the drop-down.
- To add a new DKIM record, enter this information under Add DNS Record at the top of the Zone Editor :
- Type : TXT.
- Name : Enter the DKIM host name displayed in the SPF/DKIM Setup screen. (Example:2232._domainkey)
- TXT Value : Paste the DKIM TXT record displayed on the SPF/DKIM Setup screen of your Adit account.
- TTL : Enter how long the server should take to cache the information - Click Add Record.
- If your DNS has already mentioned the domain name, enter the domain key alone in the Host Name field.
- Click here to learn more about managing your DNS record resource in your Bluehost account.
- Log in to your Adit account.
- From the navigation toolbar, choose Locations .
- Select Communications under your location.
- Click Verify Domain .
- If the records are not published in the DNS, you can check the reason and how to fix it on the same screen.
Network Solutions
- Log in to your Network Solutions account.
- Click Manage Account on the top-right corner of the page.
- Under My Domain Names, click the Edit DNS link.
- From the list of domains displayed, select the domain for which you want to add the record and click the Edit DNS button.
- Under the Advanced DNS Manager section, click the Manage Advanced DNS Records button.
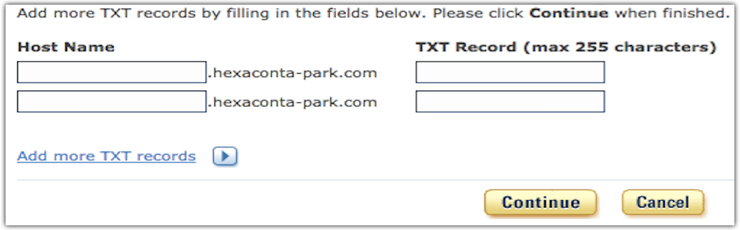
- Scroll down. Under the Text (Text Records) section, click the Edit TXT Records button.
- Enter the following information:
- Host : Enter the domain name.
- TTL : Enter how long the server should take to cache the information.
- Text : Paste the SPF TXT record displayed in the SPF/DKIM Setup screen. - Click Continue to confirm.
- Finally, click Save Changes .
- Select the domain and click the Edit DNS button.
- Under the Text(Text Record) section, click Edit TXT Records button.
- Edit the record as needed.
- Click Continue to confirm and click Save Changes .
- Log in to your Network Solutions account.
- Click Manage Account on the top-right corner of the page.
- Under My Domain Names, click Edit DNS link.
- From the list of domains displayed, select the domain for which you want to add the record and click the Edit DNS button.
- Under the Advanced DNS Manager section, click the Manage Advanced DNS Records button.
- Scroll down. Under the Text (Text Records) section, click the Edit TXT Records button.
- Enter the following information:
- Host : Enter the DKIM host name displayed in the SPF/DKIM Setup screen. (Example: 2232._domainkey)
- TTL : Enter how long the server should take to cache the information.
- Text : Paste the DKIM TXT record displayed in the SPF/DKIM Setup screen of your Adit account. - Click Continue to confirm.
- Finally, click Save Changes .
- If your DNS has already mentioned the domain name, enter the domain key alone in the Host Name field.
- Log in to your Adit account.
- From the navigation toolbar, choose Locations .
- Select Communications under your location.
- Click Verify Domain .
- If the records are not published in the DNS, you can check the reason and how to fix it on the same screen.
Register
- Log in to your Register account.
- Click Manage Account .
- Under Account Dashboard, choose Domains and click Manage .
- Locate your domain and click the Manage link.
- Under Advanced Technical Settings, click the Edit TXT Records link.
- Enter the following information:
- Host : Enter @
- TXT Record : Paste the SPF TXT record displayed in the SPF/DKIM Setup screen - Click the Continue button to confirm.
- Select the domain and click the Manage link.
- Edit the record as needed.
- Click Continue to confirm.
- Log in to your Register account.
- Click Manage Account .
- Under Account Dashboard, choose Domains and click Manage .
- Locate your domain and click the Manage link.
- Under Advanced Technical Settings, click the Edit TXT Records link.
- Enter the following information:
- Host : Enter the DKIM host name displayed in the SPF/DKIM Setup screen. (Example: 2232._domainkey)
- TXT Record : Paste the DKIM TXT record displayed in the SPF/DKIM Setup screen of your Adit account. - Click the Continue button.
- If your DNS has already mentioned the domain name, enter the domain key alone in the Host Name field.
- Log in to your Adit account.
- From the navigation toolbar, choose Locations .
- Select Communications under your location.
- Click Verify Domain .
- If the records are not published in the DNS, you can check the reason and how to fix it on the same screen.
Eurodns
To add the SPF TXT record for your domain, follow these steps:
- Log in to your Eurodns account.
- From the navigation toolbar, go to Domain Names>Active .
- Locate the domain you want to manage and click Manage .
- Under the DNS Zone section, click Manage Zone .
- Click the New Record button at the bottom of the page.
- Enter the following details:
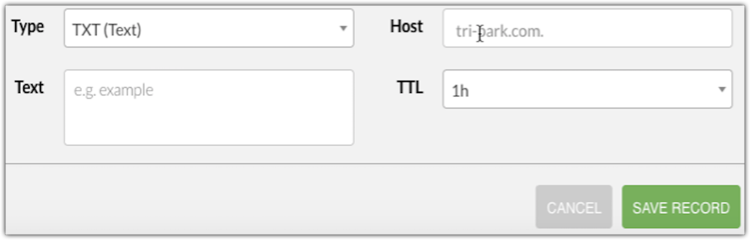
- Type : Select TXT(Text).
- TXT : Paste the SPF TXT record displayed in the SPF/DKIM Setup screen.
- Host : Enter " @ ".
- TTL : Enter how long the server should take to cache the information. - Click Save Record .
- Finally, click Save Zone to confirm.
- Select the domain and click Manage .
- Under DNS Zone, click Manage Zone .
- Locate the record and click the Edit icon.
- Edit the record as needed.
- Click Save Record and then click Save Zone to confirm.
- Log in to your Eurodns account.
- From the navigation toolbar, choose Domain Names .
- Locate the domain you want to manage and click Manage .
- Under the DNS Zone section, click Manage Zone .
- Click the New Record button at the bottom of the page.
- Enter the following details:
- Type : Select TXT(Text)
- TXT : Paste the DKIM TXT record displayed in the SPF/DKIM Setup screen of your Adit account.
- Host : Enter the DKIM host name displayed in the SPF/DKIM Setup screen. (Example: 2232._domainkey)
- TTL : Enter how long the server should take to cache the information. - Click Save Record .
- Finally, click Save Zone to confirm.
- If your DNS has already mentioned the domain name, enter the domain key alone in the Host Name field.
- Log in to your Adit account.
- From the navigation toolbar, choose Locations .
- Select Communications under your location.
- Click Verify Domain .
- If the records are not published in the DNS, you can check the reason and how to fix it on the same screen.
Squarespace
To add the SPF TXT record for your domain, follow these steps:
- Log in to your Squarespace account.
- Open Advanced DNS Settings for the domain.
- Scroll down to Custom Records .
- In the Record field of a blank row, select TXT from the drop-down.
- Enter " @ " in the Host field.
- Leave the Priority field blank. Paste the SPF TXT record displayed in the SPF/DKIM Setup screen.
- Click Add to save the SPF record.
- Locate the record you added.
- Edit the record as needed.
- Click ADD and then click Save to confirm.
- Log in to your Squarespace account.
- Open Advanced DNS Settings for the domain.
- Scroll down to Custom Records .
- In the Record field of a blank row, select TXT from the drop-down.
- In the Host field, enter the DKIM host name displayed in the SPF/DKIM Setup screen. (Example: 2232._domainkey)
- Leave the Priority field blank.
- Copy the DKIM TXT record displayed in the SPF/DKIM Setup screen in your Adit account. Paste it in the Data field.
- Click Add to save the DKIM record.
- If your DNS has already mentioned the domain name, enter the domain key alone in the Host Name field.
- Click here to learn more about managing your DNS record resource in your Squarespace account.
- Log in to your Adit account.
- From the navigation toolbar, choose Locations .
- Select Communications under your location.
- Click Verify Domain .
- If the records are not published in the DNS, you can check the reason and how to fix it on the same screen.
eNom
To add the SPF TXT record for your domain, follow these steps:
- Log in to your eNom account.
- From the navigation toolbar, choose Domains and click My Domains .
- Click Add SRV or SPF record .
- Choose Add a SPF Record from the drop-down list.
- Enter the following information:
- Host Name: Enter "@".
- TXT value: Paste the SPF TXT record displayed in the SPF/DKIM Setup screen.
- TTL : Enter how long the server should take to cache the information. - Click Save .
- Locate the record you added and click Edit SPF Text .
- Edit the record as required.
- Click Save to confirm.
- Log in to your eNom account.
- From the navigation toolbar, choose Domains and click My Domains .
- Click Add TXT record.
- Choose Add DKIM Record from the drop-down list.
- Enter the following information:
- Host Name : Enter the DKIM host name displayed in the SPF/DKIM Setup screen. (Example: 2232._domainkey)
- TXT value : Paste the DKIM TXT record displayed in the SPF/DKIM Setup screen of your Adit account.
- TTL : Enter how long the server should take to cache the information. - Click Save.
- If your DNS has already mentioned the domain name, enter the domain key alone in the Host Name field.
- Log in to your Adit account.
- From the navigation toolbar, choose Locations .
- Select Communications under your location.
- Click Verify Domain .
- If the records are not published in the DNS, you can check the reason and how to fix it on the same screen.
Wix
To add the SPF TXT record for your domain, follow these steps:
- Log in to your Wix account
- Navigate to the Domains page.
- Click the Show More icon next to the relevant domain and select Manage DNS Records
. - Click + Add Record in the TXT (Text) section.
Enter the following information:
- Host Name : Enter "@".
- SPF Value : Paste the SPF TXT record displayed in the SPF/DKIM Setup screen.
- TTL : Enter how long the server should take to cache the information. - Click Save.
Note : A sender domain can have only one SPF TXT record. We recommend not to add a new record if you already have one. If you have an existing SPF TXT record,
- Under your domain name, select Advanced and click Edit DNS .
- Edit the record as needed.
- Click Save DNS to confirm.
- Log in to your Wix account.
- Navigate to the Domains page.
- Click the Show More icon next to the relevant domain and select Manage DNS records.
- Scroll down to the TXT (Text) section and click Add Record
- Enter the following information:
- Host Name : Enter the DKIM host name displayed in the SPF/DKIM Setup screen. (Example: 2232._domainkey)
- TXT Value : Paste the DKIM TXT record displayed in the SPF/DKIM Setup screen of your Adit account.
- TTL : Enter how long the server should take to cache the information. - Click Save .
- If your DNS has already mentioned the domain name, enter the domain key alone in the Host Name field.
- Click here to learn more about managing your DNS record resource in your WIX account.
After the SPF and DKIM records for your domain have been added to the DNS servers, follow these steps to verify your domain:
- Log in to your Adit account.
- From the navigation toolbar, choose Locations .
- Select Communications under your location.
- Click Verify Domain .
- If the records are not published in the DNS, you can check the reason and how to fix it on the same screen.
WordPress
- Log in to your WordPress account.
- From the navigation toolbar, click My Site .
- Under the Manage section, click Domains .
- Click the domain for which you want to add the text record.
- Scroll down and click the Name Servers and DNS link.
- Click DNS Records to add new TXT records.
- Enter the following information:
- Type : Select TXT as type of record to add.
- Name : Enter the domain name.
- Text : Paste the SPF TXT record displayed in the SPF/DKIM Setup screen. - Click Add New DNS Record.
- Log in to your WordPress account.
- From the navigation toolbar, click My Site .
- Under the Manage section, click Domains .
- Click the domain for which you want to add the text record.
- Scroll down and click Name Servers and DNS link.
- Click DNS Records to add new text records.
- Enter the following information:
- Type : Select TXT as type of record to add.
- Name : Enter the DKIM host name displayed in the SPF/DKIM Setup screen. (Example: 2232._domainkey)
- Text : Paste the DKIM TXT record displayed in the SPF/DKIM Setup screen of your Adit account.
8. Click Add New DNS Record.
- If your DNS has already mentioned the domain name, enter the domain key alone in the Host Name field.
- Log in to your Adit account.
- From the navigation toolbar, choose Locations .
- Select Communications under your location.
- Click Verify Domain .
- If the records are not published in the DNS, you can check the reason and how to fix it on the same screen.
Ipage
- Log in to your Ipage account and go the Domains tab in the dashboard.
- In the Card View, click Manage on the domain for which you are updating the SPF record.
- In the list view, click the Settings icon.
- Click DNS & Nameservers in the left pane.
- Click DNS Records in the DNS & NAMESERVERS page.
- Click Add DNS Record to add a new SPF record.
- Enter the following information:
- Name : Enter "@".
- TTL : Enter how long the server should take to cache the information.
- Type : TXT
- TXT Value : Paste the SPF TXT record displayed in the SPF/DKIM Setup screen. - Click Add Record.
- Select the domain you want to edit.
- Under Action, select Edit .
- Edit the record as needed.
- Click ADD .
Click Add DNS Record to add a new SPF record.
- Name : Enter the DKIM host name displayed in the SPF/DKIM Setup screen. (Example: 2232._domainkey)
- TTL : Enter how long the server should take to cache the information.
- Type : TXT.
- TXT Value : Paste the DKIM TXT record displayed in the SPF/DKIM Setup screen of your Adit account.
- If your DNS has already mentioned the domain name, enter the domain key alone in the Host Name field.
- Log in to your Adit account.
- From the navigation toolbar, choose Locations .
- Select Communications under your location.
- Click Verify Domain .
- If the records are not published in the DNS, you can check the reason and how to fix it on the same screen.
HostMonster
- Log in to your HostMonster account.
- Go to the Domains menu at the top and click the Zone Editor sub menu.
- Select your domain from the drop-down.
- Click Add DNS Record at the top of the zone editor.
- Enter the following information:
- Name : Enter "@".
- TTL : Enter how long the server should take to cache the information.
- Type : TXT
- TXT Value : Paste the SPF TXT record displayed in the SPF/DKIM Setup screen. - Click Add Record .
- Select the domain you want to edit.
- Under Zone File Records, select the record to be edited and click Edit .
- Edit the record as needed.
- Click ADD .
- Log in to your HostMonster account.
- Go to the Domains menu at the top and click the Zone Editor sub menu.
- Select your domain from the drop-down.
- Click Add DNS Record at the top of the zone editor.
- Enter the following information:
- Name : Enter the DKIM host name displayed in the SPF/DKIM Setup screen. (Example: 2232._domainkey )
- TTL : Enter how long the server should take to cache the information.
- Type : TXT.
- TXT Value : Paste the DKIM TXT record displayed in the SPF/DKIM Setup screen of your Adit account - Click Add Record .
- If your DNS has already mentioned the domain name, enter the domain key alone in the Host Name field.
- If your sub domain is mail.zylker.com, the domain key should be "2232._domainkey.mail"
- Log in to your Adit account.
- From the navigation toolbar, choose Locations .
- Select Communications under your location.
- Click Verify Domain .
- If the records are not published in the DNS, you can check the reason and how to fix it on the same screen.
JustHost
- Log in to your JustHost account.
- Go to the Domains menu at the top and click the Zone Editor sub menu.
- Select your domain from the drop-down.
- Click Add DNS Record at the top of the zone editor.
- Enter the following information:
- Name : Enter the domain name.
- TTL : Enter how long the server should take to cache the information.
- Type : TXT.
- TXT Value : Paste the SPF TXT record displayed in the SPF/DKIM Setup screen. - Click Add Record .
- Select the domain you want to edit.
- Under Zone File Records, select the record to be edited and click Edit .
- Edit the record as needed.
- Click ADD.
- Log in to your JustHost account.
- Go to the Domains menu at the top and click the Zone Editor sub menu.
- Select your domain from the drop-down.
- Click Add DNS Record at the top of the zone editor.
- Enter the following information:
- Name : Enter the DKIM host name displayed in the SPF/DKIM Setup screen.(Example: 2232._domainkey)
- TTL : Enter how long the server should take to cache the information.
- Type : TXT.
- TXT Value : Paste the DKIM TXT record displayed in the SPF/DKIM Setup screen of your Adit account. - Click Add Record.
- If your DNS has already mentioned the domain name, enter the domain key alone in the Host Name field.
- Log in to your Adit account.
- From the navigation toolbar, choose Locations .
- Select Communications under your location.
- Click Verify Domain .
- If the records are not published in the DNS, you can check the reason and how to fix it on the same screen.
Cloudflare
To add the SPF record for your domain, follow these steps:
- Log in to your Cloudflare account.
- Click the appropriate Cloudflare account for the domain where you will add records
- Click DNS app.
- Click Add record .
- Enter the following information:
- Type : TXT.
- Name : Enter "@".
- IPv4 address : Paste the SPF TXT record displayed in the SPF/DKIM Setup screen.
- TTL : Enter how long the server should take to cache the information
Note : A sender domain can have only one SPF TXT record. We recommend not to add a new record if you already have one. If you have an existing SPF TXT record,
- Select the domain you want to edit.
- Click the value field of the record you want to edit.
- Edit the record as needed.
- Click Save.
- Log in to your Cloudflare account.
- Click the appropriate Cloudflare account for the domain where you will add records
- Click DNS app.
- Click Add record .
- Enter the following information:
- Type : TXT.
- Name : Enter the DKIM host name displayed in the SPF/DKIM Setup screen. (Example: 2232._domainkey)
- IPv4 address : Paste the DKIM TXT record displayed in the SPF/DKIM Setup screen of your Adit account.
- TTL : Enter how long the server should take to cache the information.
- If your DNS has already mentioned the domain name, enter the domain key alone in the Host Name field.
- Log in to your Adit account.
- From the navigation toolbar, choose Locations .
- Select Communications under your location.
- Click Verify Domain .
- If the records are not published in the DNS, you can check the reason and how to fix it on the same screen.
Public Domains
Related Articles
Set up a Tracking Number
Before we get started, please keep in mind that only the Owner-level and Manager-level users are able to set up tracking numbers. Also, this article is assuming that a tracking number has been purchased already or is ported into your account. If you ...Set Up Your Call Flow (Call Tree)
How to Set Up Your Call Flow The call flow allows you to do the following: Select which phones in your office should ring and when Establish your office schedule for inbound calls Play a greeting when patients call you Play a voicemail greeting for ...How to setup a Voice Print
What Is a Voice Print? A Voice Print is a secure voice sample of a staff member that allows Adit Call Intelligence to recognize who spoke during a phone call. Every person’s voice is unique. Voice Print captures key vocal characteristics so Adit can ...How to set up the microsite
With the microsite, you can send patients an easy link to go schedule their next appointment. You can send this link via SMS, email, or add it on your website. To set a Receptionist Email: Navigate to the Online Scheduling module. In the top ...Set up email notifications
To set up a email notifications: Click on the Settings gear icon in the top right corner of your Adit platform. In the My Profile menu, click Notifications Based on the type of email notification you would like to receive, click on Add Notification ...