How to Create Patient Lists
Patient lists are a really helpful and versatile way to target specific patient groups in your book of business.
Using our filters, there are endless possibilities for targeted email campaigns, patient communications, collections, insurance, promotions etc.
Some frequently used examples for Dental are: Recall campaigns, Unscheduled treatment campaigns, Use it or lose it campaigns, Insurance updates.
Some frequently used examples for Optometry are: Consult followup, Pending Eyewear Pickup, No show followup.
Let's get started!
Navigate to Practice Analytics. Click on Patient lists from the top menu.
(Do not miss out on the Popular lists that have been created and are available without additional creation needed.)
Click Create list on the far right.
Select Patient Status. "Is Active" is pre-selected. This is the status of the patients in your EHR/PMS.
Add your first filter. Click Select Filter to search.
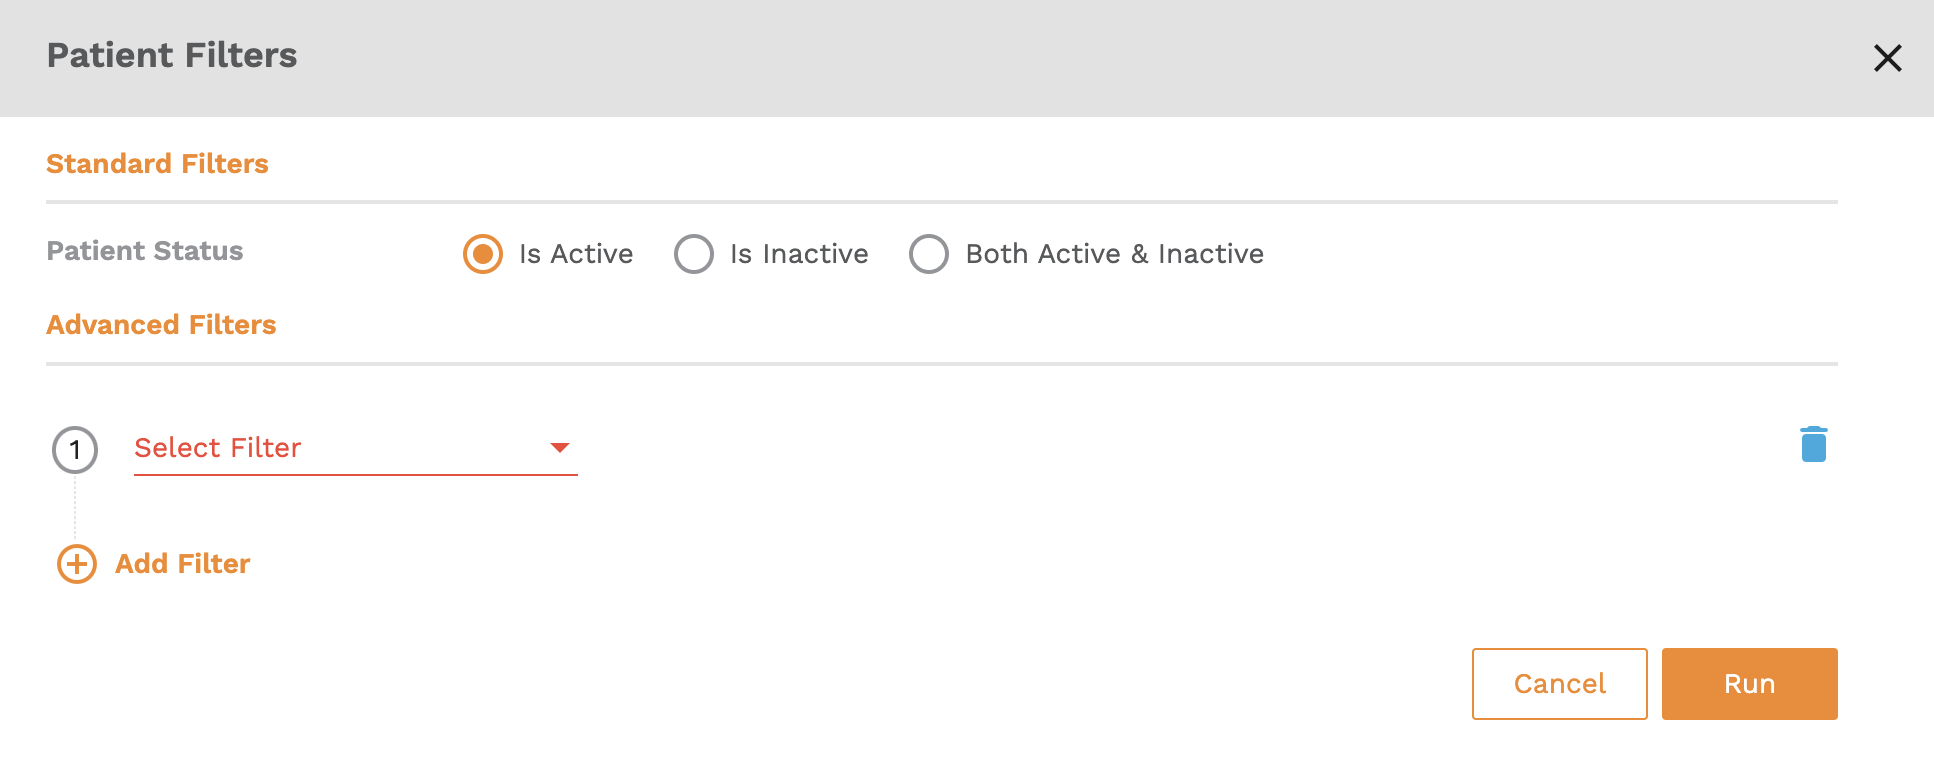
To add additional filters press the plus sign beside "Add Filter". It is possible to add up to seven filters.
When you have selected the filters and specified any additional filter types click "Run" to get a report back.
If you receive a message that says "no data" you may need to edit your filters.
Click Edit List in the top right to edit your filters again.
Dental Patient List suggestions
Recare (this logic corresponds to Reports > Recare and is used to reactivate patients who have gone some time without being scheduled)
Filter 1 - Last completed appointment - Choose a date range filter "between" either by quarters (Jan 1 - Mar 31) or 6 month increments (Jan 1 - Jun 30) to keep your lists manageable for mass texting functionality.
Filter 2 - Add an additional filter "Next appointment scheduled" and choose "no". Click "run".
Unscheduled treatment (this logic finds patients who have diagnosed treatment that is unscheduled)
Filter 1 - Unscheduled treatment - Choose a date range filter of "after" and choose a date you would like Adit to start finding diagnosed treatment. The advantage of this filter is that it is open ended and will continue to be relevant into the future.
Choose an amount filter of "above" and choose a dollar amount you would like to start at. (we suggest starting with an amount below your fee schedule for a filling)
Choose whether you would like to find all treatments or specific. If selecting "all" it is good to go and click "Run".
If you would like to find a specific treatment code choose "specific treatment". Then add a code according to what is included in the treatments plans you would like to find. (use the search bar instead of scrolling quick search of the codes) Click "Run".
Optometry Patient List suggestions
Following up with Consults
Filter 1 - Completed treatment - Choose a date range filter "is after" and choose "specific treatment" instead of all treatment. Select the code associated to the consult for a specific patient group.
Filter 2 - Next appt scheduled - select "no". Click "run".
Filter 1 - Completed treatment - Choose a date range filter "is after" and choose "specific treatment" instead of all treatment. Select the code associated to the consult for a specific patient group.
Filter 2 - Next appt scheduled - select "no". Click "run".
Related Articles
Create and Manage Mailing Lists
Mailing Lists allows you to upload your patient list from a CSV file directly into the database. You can use these lists to send mass emails, and share important news about your practice. To View Your Mailing Lists: Navigate to the Email Campaigns ...Create and manage patient segments
Patient segments allow you to generate lists of patients that meet a desired set of criteria. You can then use these lists to send bulk messages, i.e. to prompt them to book an appointment or to share important news about your practice. To create a ...CareCredit: How to Create A Report in Patient Lists for Batch QuickScreen
On the home page, select the Practice Analytics module In the top navigation, select Patient Lists Select Create List In the Pop Up, you can begin customizing which filters you want to use in order to create your custom patient list. Select a patient ...Create and Activate a Drip Campaign
Drip Campaigns is a feature that allows you to send several emails to your target audience over a series of timed intervals. Using drip campaigns is a great way to communicate with your patients and encourage them to stay engaged with your practice! ...View The Activity Log and Create Notes in the Patient Card
The patient card makes it easy to manage a patient’s details all in one place. Here is how to view your patient notes. Please keep in mind that the notes feature is only available if the Practice Analytics module is enabled. To open up a patient’s ...