Guide to Setting Up Online Scheduling
Advanced Online Scheduling allows your patient to book specific services at specific times, directly into your EHR schedule. This helps streamline your scheduling and saves your staff time by allowing patients to book on their own.
To learn how to set up online scheduling please follow this guide:
How to Set Up Your Receptionist Email
Navigate to the Online Scheduling module.
In the top navigation menu, select Scheduling.
If you don’t see this option in the menu, click the three dots to view the rest of the menu options.
Click the Edit icon for the location you would like to update.
In the Receptionist Email(s), add all email addresses which should receive a copy of each appointment request. Separate emails with a comma (no space).
Click Save to save your changes.

How to Enable Advanced Online Scheduling
Scroll down to Online Scheduling?
Toggle the switch on or off as needed and click Confirm when prompted.

How to Enable Appointments to Be Written into the EHR
Scroll down to this field: Write Appointments into EHR/PMS?
Toggle the switch on

How to Manage Service Rules
Defining your services will allow patients to book with a particular provider in a particular operatory at a particular time, ensuring your schedule is seamless and saving your office staff time. Make sure the services are clearly defined and easy for your patients to understand the schedule.
Scroll down to Reasons for Visit.
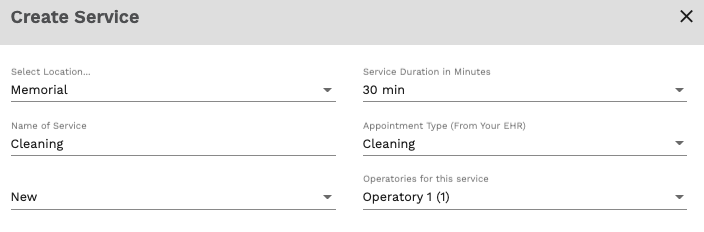
Click + Create Service and fill out the required fields:
Name of Service: Choose a name that patients will understand, as this will display on the booking form.
Patient Type: Is this service for New or Returning patients?
Service Duration in Minutes: Choose the amount of time to block in your schedule for this service.
Appointment Type: Select the type from the dropdown menu (if applicable)
Operatories: Select all operatories where this appointment can be booked.
Click the Add button to save the service.
Click the toggle switch to turn the service on or off.
If the switch is gray with the button to the left, it is off.
If the switch is orange with the button to the right, it is on.
How to Manage Provider Rules
Scroll down to Providers-Service Rules. Click on the toggles to enable the necessary providers.
Update the matrix grid by checking the boxes that are necessary to match services to providers.
Click Save to save your changes.

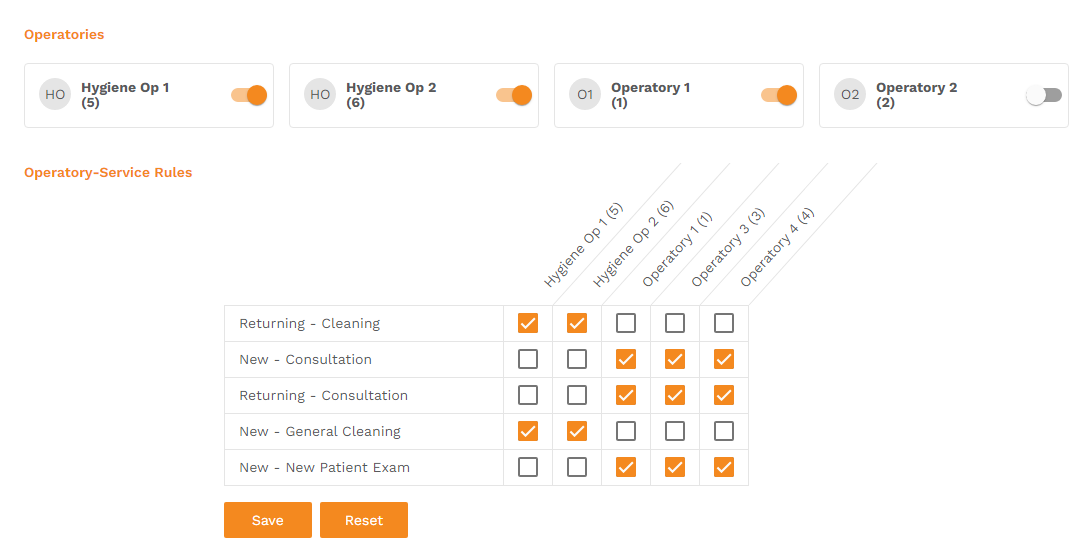
How to Manage Operatory Rules
Scroll down to Operatories-Service Rules. Click on the toggles to enable the necessary operatories.
Update the matrix grid by checking the boxes that are necessary to match services to operatories.
Click Save to save your changes.
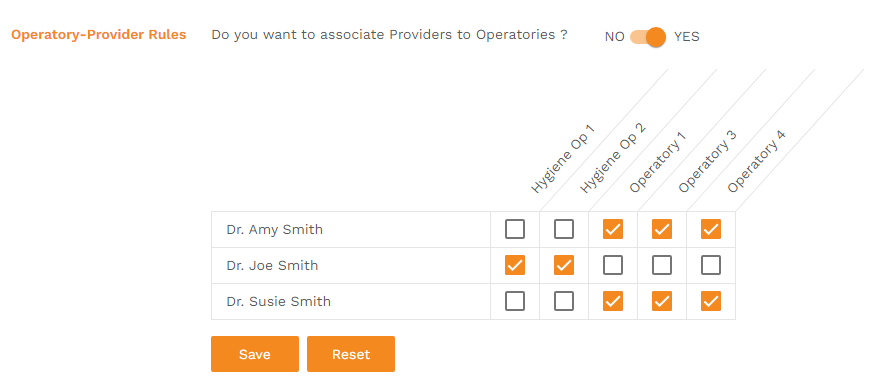
Scroll down to Operatory-Provider Rules, if providers are enabled.
Update the matrix grid by checking the boxes that are necessary to match providers to operatories.
Click Save to save your changes.
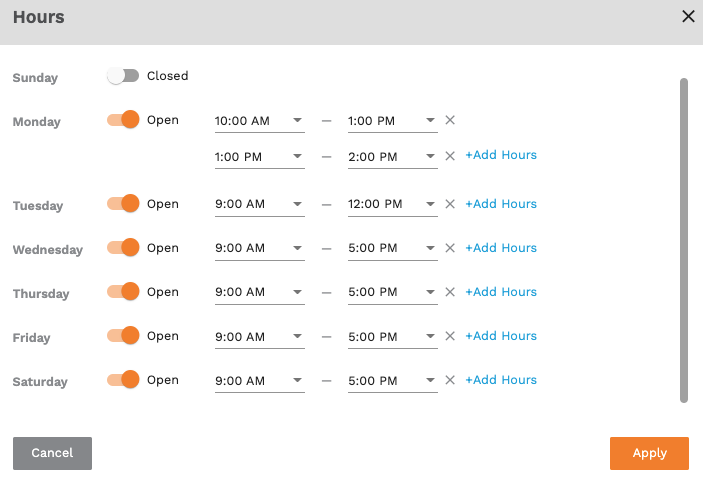
How to Set Your Office Hours
Scroll down to Business Hours.
Click the Edit button.
Select the days and times your office is open.
Click Apply to save your changes.

How to Define the Earliest Time a Patient can Book Their Appointment
Scroll down to the Calendar Buffer.

Enter how many hours in advance you require patients to schedule. For example: if your practice does not offer same-day appointments, enter at least 24 in the Calendar Buffer field. If you would like online bookings to be restricted to two days or further out, enter 48 hours.
How to Require Patients to fill out their Payment Preference
Scroll down to Ask for Payment Preference?

Toggle the switch On
If you want to make this field mandatory to be filled out, select Payment Option is Required
Now when patients fill out the form, there will be a field asking them to select how they will be paying for their services.


Related Articles
Guide to Adit Notifications
Adit Voice makes it super easy to manage and view your missed calls, voicemails, eFaxes, and all of your notifications in one place. How to Quickly View Your Phone Notifications. Call Pop. When logged into the homepage of your dashboard, you can ...AI Agent Call Flow Setup Guide
Overview The AI Agent can be configured for practices using either: Adit Phones A Third-Party Phone Provider The setup process differs depending on the phone system being used. This guide explains the requirements, call flows, and warm transfer ...Guide to Adit's Integration with Cloud-based EHRs
Adit’s integration with cloud EHRs uses a browser extension for Google Chrome. This extension allows us to sync your patient and appointment information into the Adit platform, where you can then use our all-in-one solution to manage your practice, ...Guide to Insurance Verification Charges
Revenue Cycle Management · Pricing Three verification packages, from fully automated to expert-reviewed, so you only pay for the accuracy your practice needs. Adit offers three types of Insurance Verification services designed to meet different ...Guide to Automating Patient Forms
One of Adit's greatest value adds is to be able to automate your patient forms - we can automate sending them to patients, importing them into your EHR, and updating certain fields from the forms once imported. Automating all of these processes can ...